 Aspire Budgeting
Auto-categorization
Learn how Auto-Categorization infers Payees, fills Categories, and marks confidence using your own transaction history — no AI required.
Updated August 13, 2026
Auto-Categorization fills blank Payee and Category cells by looking at similar transactions you’ve already reviewed. No AI, no external services, and no rules to configure — just your own history, working for you.
Requires Aspire Turbo. Auto-Categorization is a subscriber-only feature available in the Aspire Budget add-on sidebar.
How it works
When you click “Auto-Categorize” in the add-on sidebar, the add-on works in two stages:
- Infer the Payee. For transactions with a blank Payee, it compares the bank description with descriptions from reviewed transactions and selects the Payee most consistently associated with that pattern.
- Infer the Category. It combines the Payee and bank description when possible, then selects the Category most consistently used for similar reviewed transactions. If the sheet has no Payee column, description-based Category matching still works.
Existing Payees and Categories are never replaced. Only blank cells with sufficient historical evidence are filled.
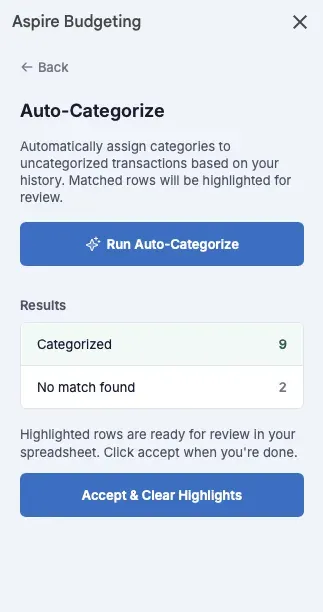
Afterward, the sidebar shows separate Payee and Category totals, confidence counts, and the number of Categories left blank.
No AI, no external services
Auto-Categorization runs entirely inside your Google Sheet. Your transaction data is never sent to any external server, API, or machine learning service. Matching combines normalized descriptions, Payee history, and the frequency of prior choices.
This means:
- Your data stays private — nothing leaves your spreadsheet
- It gets better over time — the more transactions you categorize manually, the more the add-on can match automatically
- It’s predictable — suggestions come from the Payees and Categories you’ve already used
Merchant normalization
Bank memos are messy. “COSTCO WHSE #1234 DURHAM NC” and “COSTCO WHOLESALE RALEIGH” are the same merchant, but the raw text is different.
Auto-Categorization normalizes merchant names before matching by stripping:
- Store numbers and location codes
- City names and state abbreviations
- Phone numbers and URLs
- Transaction type prefixes (e.g., “DEBIT CARD PURCHASE”)
- POS system prefixes (SQ*, TST*, SP)
- Common noise words (Inc, LLC, Online, etc.)
The matcher checks normalized exact matches first. It can also recognize a known merchant contained within a longer description and conservative typo matches when the best result is unambiguous. Approximate matches require more supporting history than exact matches.
This means a transaction from “SQ *BLUE BOTTLE COFFEE SF CA” can match a previous “SQ *BLUE BOTTLE COFFEE OAKLAND CA” because both normalize to the same merchant identity.
Review confidence
Only the Payee and Category cells changed by Auto-Categorize are marked:
- High confidence — light blue with a solid border. The suggestion is backed by repeated, consistent exact history.
- Review suggested — light orange with a dashed border. The suggestion is based on limited or approximate history and deserves closer attention.
Review the marked cells directly in the Transactions sheet. Correct any suggestion that is wrong, then click Accept & Clear Review Marks in the sidebar. Predictions that are still marked are excluded from future matching history, so Auto-Categorize does not teach itself from unreviewed output.
When it doesn’t match
Auto-Categorization leaves a Payee or Category blank when:
- The description is new or too generic after normalization
- Similar descriptions have conflicting Payees or Categories
- An approximate match does not have enough repeated history
- Two possible matches are too close to choose safely
In these cases, fill the value manually. That reviewed transaction can provide evidence for future runs.
Best used with CSV Import
The typical workflow is:
- Import a batch of transactions via CSV Import
- Open Auto-Categorize and click Run Auto-Categorize
- Review the marked Payee and Category cells in the Transactions sheet
- Correct anything that needs changing, then click Accept & Clear Review Marks
- Manually fill any cells that Auto-Categorize left blank
The more months you use Aspire Budgeting, the more effective Auto-Categorization becomes.